TL;DR:
- Step-by-step social video scheduling streamlines content preparation, adaptation, and timing across multiple platforms from a centralized workflow. Effective planning requires appropriate accounts, tools, and format compliance before uploading media and customizing captions per platform. Maintaining separate production and publishing calendars, batching content creation, and analyzing audience data optimize engagement and consistency.
Step by step social video scheduling is the process of preparing, adapting, and timing your video content across multiple social platforms from a single, centralised workflow. Done well, it replaces the chaotic tab-switching and last-minute uploads that drain hours from a content creator's week. Tools like SocialBee, Sprout Social, Meta Business Suite, and YouTube Studio each offer distinct scheduling capabilities, and knowing which to use, and when, is what separates reactive posting from a repeatable publishing system. This guide walks you through every stage: from account setup and tool selection to platform-specific workflows and best practices that keep your social video strategy running without friction.
What tools and accounts do you need before scheduling social videos?
Effective social media video planning starts before you touch a scheduler. You need the right account types, the right tools, and a clear picture of what each platform demands from your video files.
Account types and platform access
Every major platform requires a Business or Creator account to unlock scheduling features. Personal accounts on Instagram and Facebook do not support Meta Business Suite's planner. YouTube requires a verified channel to schedule videos in advance. TikTok's scheduling feature is available through TikTok Studio, but only for accounts in good standing with no recent policy violations.
Native schedulers vs third-party tools
Native schedulers are free and deeply integrated with their platforms. Meta Business Suite handles Facebook and Instagram posts and Reels. YouTube Studio schedules standard uploads up to 12 months ahead. The limitation is that each native tool operates in isolation, so managing four platforms means four separate workflows.
Third-party tools solve this by centralising everything. SocialBee uses a category-based system that assigns posts to recurring time slots automatically, which is particularly useful for high-volume Shorts posting. Sprout Social adds approval workflows, bulk CSV scheduling, and its ViralPost feature, which recommends optimal posting times based on your audience's activity. For teams managing multiple clients or brands, the centralised calendar view alone justifies the subscription cost.
Video format and technical requirements
Before uploading anything, confirm the format requirements for each platform. Instagram Reels require vertical video at 9:16 aspect ratio, with a maximum length of 90 seconds. YouTube Shorts must be under 60 seconds and vertical. Standard YouTube videos accept horizontal or vertical formats up to 12 hours in length. Facebook supports both square and vertical formats for Reels. Caption character limits also vary: Instagram allows 2,200 characters, TikTok 2,200, YouTube titles cap at 100 characters, and Facebook posts allow up to 63,206 characters.
| Tool | Best for | Batch scheduling | Approval workflow | Free tier |
|---|---|---|---|---|
| Meta Business Suite | Facebook and Instagram | Limited | No | Yes |
| YouTube Studio | YouTube only | No | No | Yes |
| SocialBee | Multi-platform, Shorts | Yes (category-based) | Yes | Trial only |
| Sprout Social | Teams and agencies | Yes (CSV upload) | Yes | Trial only |
How to execute the step by step workflow for scheduling social videos
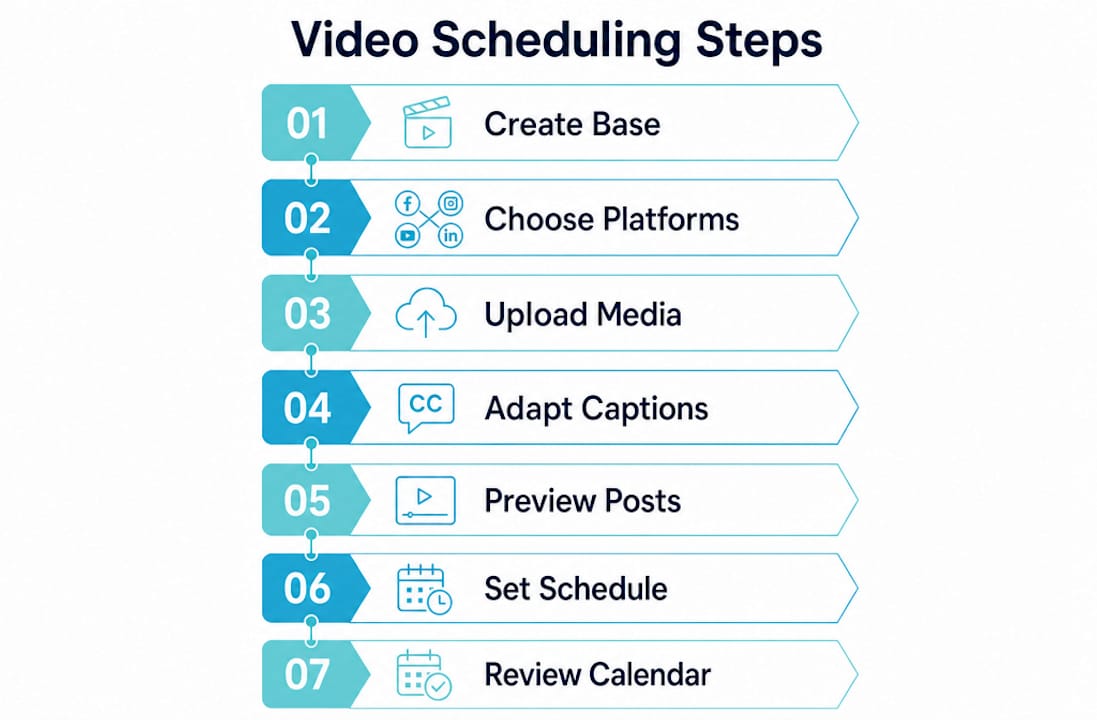
A proven scheduling workflow follows a clear sequence: create one base post idea, select your platforms, adapt captions, upload media once, preview per platform, then schedule from a shared calendar. Skipping steps or reversing the order is where most creators lose time.
Step 1: Create your base video and caption
Write one core caption that captures the video's message. Do not write platform-specific versions yet. This base caption is your raw material. Keep it under 150 words so it fits every platform with room to trim.
Step 2: Select your target platforms
Decide which platforms will receive this video before you write a single platform-specific word. Choosing platforms first significantly reduces content rework and improves scheduling speed across networks. If the video is vertical and under 60 seconds, it suits TikTok, Instagram Reels, YouTube Shorts, and Facebook Reels. A longer horizontal video belongs on YouTube and Facebook only.
Step 3: Upload media once to your scheduler
In SocialBee or Sprout Social, upload your video file once to the central media library. Both tools allow you to attach the same asset to multiple platform-specific posts without re-uploading. This single step removes one of the most common sources of scheduling friction.
Step 4: Adapt captions per platform
Now write platform-specific captions from your base version. Instagram captions benefit from three to five hashtags placed at the end. TikTok captions should be punchy and front-loaded with the hook. YouTube descriptions need keywords in the first two lines for search visibility. Facebook captions can be longer and more conversational.
Step 5: Preview each post before scheduling
Every reputable scheduler includes a preview function. Use it. Reels previews confirm your thumbnail crop. YouTube previews show how your title and description appear in search results. Sprout Social's preview panel shows desktop and mobile views side by side.
Step 6: Set your schedule and confirm time zones
Add each post to your publishing queue or assign a specific date and time. YouTube Studio schedules standard videos up to 12 months in advance, which is useful for planned series or seasonal content. Confirm your time zone setting in every tool before publishing, as a mismatch between your local time and the scheduler's default is a common cause of mistimed posts.
Step 7: Review your calendar
Open your content calendar and confirm there are no gaps or overlaps. A well-maintained video content calendar shows production status, platform assignments, and publish dates in one view.
Pro Tip: Schedule your Reels and Shorts in batches of five to ten at a time. Batch creation sessions reduce context-switching and keep your publishing queue full for two to three weeks without daily manual input.
How do platform-specific scheduling features affect your strategy?
Platform scheduling features are not uniform, and treating them as interchangeable creates gaps in your workflow. Understanding each platform's constraints lets you choose the right tool for each job.
Meta Business Suite supports scheduling for both Facebook posts and Instagram Reels through a single planner interface. The Meta Business Suite workflow covers create, upload, and schedule in a straightforward sequence. The limitation is that it does not support TikTok or YouTube, and its Reels scheduling has historically lagged behind third-party tools in terms of automation features.
YouTube Studio's native scheduler handles standard video uploads well. You upload the file, complete the metadata, set visibility to "Scheduled," pick your date and time, and confirm. The platform recommends uploading at least 24 hours before your intended publish time to allow for processing and notification delivery. YouTube Shorts, however, lack native batch scheduling. If you post Shorts daily or multiple times per week, managing each one manually through YouTube Studio becomes unsustainable quickly.
SocialBee addresses the Shorts gap directly. Its category-based system lets you upload Shorts in bulk and assign them to a recurring category slot. The scheduler fills future time slots automatically without requiring you to pick a specific time for each individual Short. For high-volume Shorts posting, this category-based auto-fill removes manual timing overhead entirely.
The core trade-off between native and third-party tools comes down to depth versus breadth. Native tools offer deeper platform integration and are free. Third-party tools offer cross-platform visibility, bulk scheduling, and team features that native tools cannot match. Most professional social media managers use both: native tools for platform-specific optimisation and a third-party scheduler for calendar management and bulk operations.
Pro Tip: When scheduling Instagram Reels, pair each Reel with a corresponding Story scheduled 30 minutes after the Reel publishes. This drives viewers from the Story back to the Reel and increases total view counts without additional content creation.
What best practices optimise your video scheduling for engagement?
The best practices for video scheduling separate creators who post consistently from those who post reactively. These habits reduce manual workload and improve reach simultaneously.
Separate your production and publishing calendars
A content calendar that integrates production workflow status allows teams to schedule with production readiness, preventing last-minute issues. Split your calendar into two layers: a production calendar tracking scripts, assets, edit status, and approvals, and a publishing calendar tracking platform, date, time, and caption status. When both layers live in the same document or tool, you can see at a glance whether a video is ready to schedule or still in edit.
Batch your creation and scheduling sessions
Batch creation is the single most effective habit for maintaining a consistent posting schedule. Set aside one day per week or fortnight to film, edit, and schedule your next block of content. Creators who batch their social video workflows report significantly less daily decision fatigue and more consistent publishing frequency.
Use analytics to time your posts
Every platform provides audience activity data. Instagram Insights shows when your followers are most active by day and hour. YouTube Analytics shows traffic source patterns and peak viewing times. Sprout Social's ViralPost feature analyses your historical engagement data and recommends specific posting windows. Scheduling into peak activity windows consistently outperforms posting at arbitrary times.
Customise every caption, not just the video
The video file can be identical across platforms, but the caption must be native to each one. A caption written for YouTube's search algorithm will read as stiff and keyword-heavy on TikTok. A TikTok caption written for trend participation will look out of place on a Facebook business page. Treat caption adaptation as a non-negotiable step in your scheduling workflow, not an optional finishing touch.
Review and reschedule regularly
A publishing calendar is not a set-and-forget document. Review your scheduled posts weekly. If a trending topic makes a scheduled video suddenly irrelevant or tone-deaf, reschedule it. If a post underperforms, analyse the timing, caption, and thumbnail before reposting. Scheduling flexibility is as important as scheduling discipline.
Key takeaways
Effective step by step social video scheduling requires a centralised workflow, platform-specific adaptation, and a content calendar that tracks both production status and publish dates.
| Point | Details |
|---|---|
| Build your workflow in sequence | Create a base post, select platforms, then adapt captions to avoid repetitive rework. |
| Upload media once | Use a central scheduler like SocialBee or Sprout Social to attach one file to multiple platform posts. |
| Match tools to platform needs | Use native schedulers for depth and third-party tools for cross-platform calendar management. |
| Separate production and publishing | Track asset readiness in a production calendar and publish dates in a separate publishing layer. |
| Batch schedule for consistency | Scheduling five to ten posts in one session keeps your queue full and reduces daily manual input. |
Why I think most creators are scheduling backwards
Most creators I speak with build their scheduling workflow in the wrong direction. They film a video, upload it to one platform, write a caption, then repeat the entire process for the next platform from scratch. That approach treats each platform as a separate project rather than a single piece of content distributed intelligently.
The insight that changed how I think about this is deceptively simple: choosing platforms before adapting captions saves more time than any tool upgrade. When you know upfront that a video is going to Instagram Reels, TikTok, and YouTube Shorts, you write three captions once, in one session, with the right tone for each. When you decide platform by platform after uploading, you rewrite the same core message three times across three different sessions.
The other habit I see underused is the split calendar. Teams that track production status and publish dates in the same column end up scheduling videos that are not ready, or holding back videos that have been ready for days. A production calendar and a publishing calendar are different documents solving different problems. Keeping them separate is not extra admin. It is the thing that makes your schedule reliable.
The tools matter less than the sequence. Whether you use SocialBee, Sprout Social, or a native scheduler, the workflow is the same: base post, platform selection, single upload, caption adaptation, preview, schedule. Master that sequence and the tool becomes interchangeable.
— Stephen
Take your video content further with Media Borne
Scheduling is only as effective as the content you are scheduling. If your videos are not capturing attention in the first three seconds, no posting time or caption strategy will compensate.
Media Borne produces social video content built for the platforms where your audience actually watches. From short-form Reels and Shorts to longer-form social series, the production work is designed to perform within the scheduling systems you have already built. Explore Media Borne's video production services to see how production quality and scheduling discipline work together. For brands focused on converting viewers into buyers, the social selling video offering is built specifically for that outcome.
FAQ
What is step by step social video scheduling?
Step by step social video scheduling is a structured workflow for preparing, adapting, and timing video content across multiple platforms from a single process. It covers tool selection, caption adaptation, media upload, preview, and calendar scheduling in a fixed sequence.
Which scheduling tool is best for multiple platforms?
SocialBee and Sprout Social both support multi-platform scheduling with batch capabilities and approval workflows. SocialBee's category-based system suits high-volume Shorts posting, while Sprout Social's CSV bulk upload and ViralPost feature suit larger teams managing diverse content types.
Can you schedule YouTube Shorts in bulk?
YouTube Studio does not support native batch scheduling for Shorts. SocialBee's category-based scheduling allows you to upload Shorts in bulk and assign them to recurring time slots automatically, removing the need to set a specific time for each individual Short.
How far in advance can you schedule YouTube videos?
YouTube Studio allows you to schedule standard video uploads up to 12 months in advance. The platform recommends uploading at least 24 hours before the intended publish time to allow for processing and subscriber notification delivery.
What should a video content calendar include?
A video content calendar should function as a production operating system, capturing video production status, assets, metadata, platform assignments, and publish dates. Separating production tracking from publish scheduling prevents last-minute gaps and keeps your queue reliable.